Showing posts with label wall. Show all posts

Travel | Follow that pink coat

Saturday, December 19


This month I decided to celebrate the holidays a little differently. For the first time, I'll spend them away from home. I was a bit nervous about the idea at first. I absolutely love Christmas in California. It's warm, relaxing, and my mom always cooks a bombtastic meal. Every single time. I also get to wear my pajamas all day and not feel one ounce of shame about it. However, now that I'm married and living this whole adult life deal, I thought it was about time I expand my Christmas traditions. So, this month, I'll be traveling across Europe and spending the holidays with my husband and his family in the Czech Republic! The weather will be colder, the language harder to understand (have you ever tried to learn Czech?!), and possibly a lot more beer at dinner time. But life is an adventure right?! I'm ready to dive in.

In the meantime, you can follow my colorful journey as I trek across Paris, London, Geneva, and Prague! My unifying theme will be #followthatpinkcoat as I capture colorful sites wearing this perfect pink coat I found from Asos. There will also be travel posts on the blog for each city coming this month, as well as daily updates on my Instagam (@creativekipi). Let's go for a colorful adventure this season, shall we?! 

How are you celebrating the holidays? Feel free to share below - I'd love to hear! 


DIY | Easy Sunset Wall Art

Friday, May 8


Today's project is inspired by my favorite body of nature - the sun! I was approached to collaborate with Glade to creatively come up with a DIY Decor project that reminded me of summer days by a lake. I immediately felt nostalgic for sunsets over the water, bonfires crackling into the pastel sky, and that giggly warm realization you have when you realize life is pretty darn beautiful. Welp, now that the cheesy inspirational me has spoken, let's get to the fun part! This ombre wall decor is super simple, colorful, and can be completed in under 15 minutes. Sound good? I thought so! Click to read more for the deets...


DIY || #33 || Walking on Walls

Monday, February 2


And I did it again - a DIY Woven Wall Art with less than half the effort! Clearly I really don't want to learn the beautiful art of weaving, but when you don't have much time after work it's nice to still create something similar in less time. Last year, I created this "No-Weave Wall Hanging" which introduced a new way to style tassels onto an embroidery sheet. Today's project is definitely one of my all time favorites that uses this technique and, thankfully, my roommates agree since it's now a new part of our apartment decor! I purchased this Plum & Bow Connected Stripe Rug from Urban Outfitters for $24 and bought about $20 of plastic spring flowers from Michael's Arts & Crafts Store (they were on sale!). Together, with some yarn and glue, I was able to create this wall art that adds a unique twist to the typical woven wall pieces. The main trick is to find a rug with texture and a hand woven-like pattern as a base. The way I created this piece allows for the flowers and 3D elements to be taken off and replaced if need be, so you can always change the look with the seasons or simply re-use the rug for its original purposes! Versatility and colorful creativity - that's what I'm talkin' about! Alrighty, here are the details below: 


What you'll need: a rug (ideally thin enough to pierce flora stems through or with strong weaving - I got this one at Urban Outfitters); flowers and greenery (from Michael's); yarn; string, plastic embroidery sheets, scissors; nails, glue gun.


Step-by-step Instructions: First, layout your flowers and yarn and try to sketch or visually imagine a design you want to create on your rug. Next, to create the yarn tassels, I wrap the yarn around the palm of my hand a few times (around 7-10 times). Carefully slide this off your hand and, with a thin string, make a knot on one side of the yarn loop. Use scissors to cut the other end of the loop so the bottom yarn hangs freely. Depending on the design you want to create, tie these string tassels to the plastic embroidery sheet. I easily attached the plastic embroidery sheets to the rug using bobby pins - just slid them into the string wrapping throughout the rug (this is why it's helpful to have a rug like this as your base with woven-like details!). To attach flowers to the rug, I cut the stems so there was at least 2-3 inches from the petals/leaves. Carefully, I slid the stems in between the woven parts of the rug. On the back side of the rug, I bent the floral stems so they would not move. An alternative thing that can be done (and that I did in some cases when the stems were too short), is to use a glue gun and attach the flower directly to the rug surface. 


To prepare the rug for hanging: I bought a thing wood dowel for less than $1 at Michael's. Fold one end of your rug over this wooden dowl (how much you fold over depends on how long you want your wall tapestry...I did about 3- inches). Sneaky little trick I did here! Since the rug is quite thick and heavy, I knew that glue or sewing wouldn't hold very well. SO I took some long, thick metal nails (yes, nails!) and wove them through the string on the rug as if I was threading them shut. I used three nails in total (sides and middle). Lastly, wrap string or twine around the edges of the dowel to create a line of the rug to hang on a nail. If you haven't put a nail in the wall yet - you should do that too! That's it! Super fun craft to brighten up your home decor! Give it a try or let me know what you think! 


DIY || #27 || Weaving...Aint nobody got time for that!

Friday, June 27


Okay, so I stand corrected. Some people do have time to learn weaving and continue on to produce beautiful products. This is one I have been admiring a bunch lately, in addition to this, this, and this. For those of us who have more admiration than free time, a little shortcut doesn't sound so bad, right? I tried a couple of ways and finally settled on this tutorial to create a non-woven but still 'woven-like' trendy wall hanging. The best part is that it took an insignificant amount of time (1-2 hours), can be easily customized even after it is completed, and cost me less than $25 for all the materials. Boo yah! So let's get started...


The items you will need: yarn (variety of colors/sizes/types), stiff plastic canvas, thread (the slightly thicker the better), scissors, stick (I used an old paint roller), and leather string for hanging. Keep in mind that you can add any other type of detail to your piece such as wooden beads, fabric scraps, etc. depending on the look you are going for. I spent about $16 on yarn. $0.50 on the canvas, $4.00 on thread/leather string, and $0 on the stick = a total of $20.50!

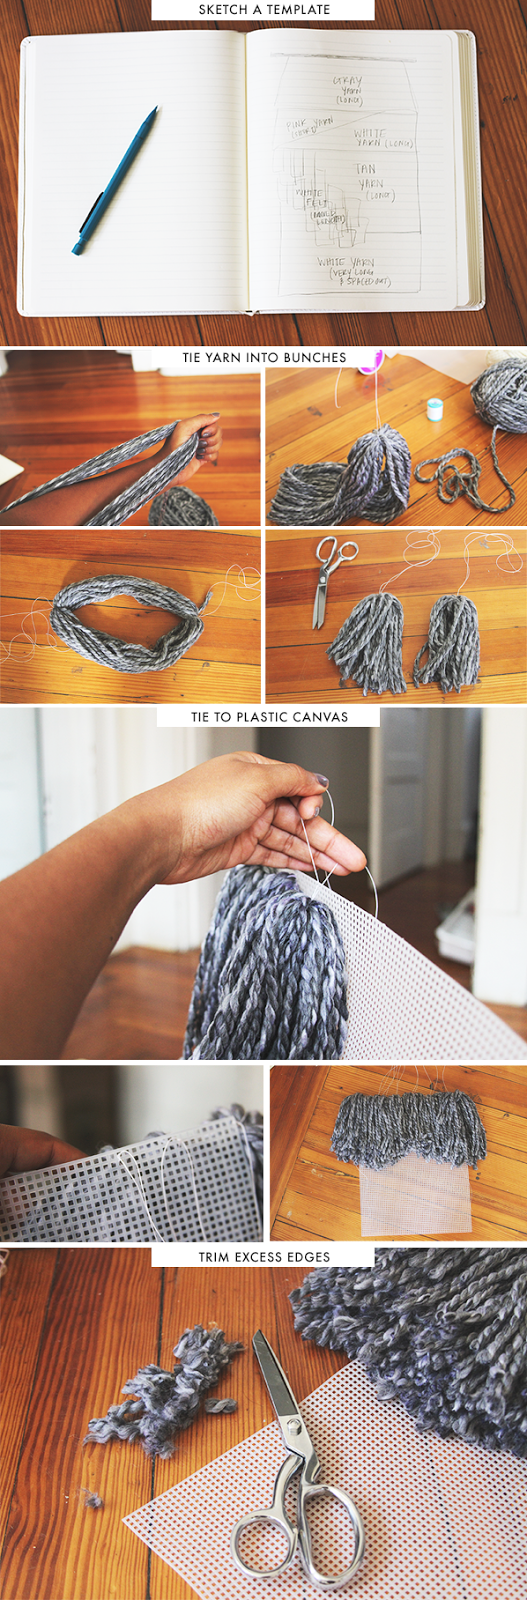
Basic steps: First start by sketching a rough template of what the final piece will look like. It doesn't have to be exact and does not have to be followed once you get going. Just gives you a nice visual to have before getting started and to refer back to if needed. Next, start making the yarn tufts. For the longer length pieces, I wrapped the yarn around the length of my arm, tied a piece of thread to each side of the loop, and cut across the loop in the middle to yield two tufts each tied together by thread. The more you wrap the yarn around your arm, the thicker your tufts will be and the less you will have to make to go across the width of the board. For this top gray layer I made 6 tufts, each created after wrapping the yarn around my arm about 20 times. For smaller tufts, I simply wrapped the yarn around the palm of my hand. Once you have created your tufts tied to string, you can start attaching them to the plastic canvas. For the very top layer, make sure to leave the first row of boxes open so you attach the board to the stick to be hung up. So starting in the second row, simply slide the strings through the boxes in the plastic canvas and tie them together into a knot on the back of the canvas, making sure the tuft is pulled up close to the board as much as possible. Now just repeat! Space the yarn tufts out so they overlap enough not to show the canvas underneath. Once all set, trim off any excess edges or cut the yarn as desired to get the look you want.


The last step is to attach the plastic canvas to a wooden stick. I used an old paint roller we had laying our the apartment which ended up being the perfect size. First I looped leather string through a couple holes in the top corners of the canvas then loop them numerous times around the ends of the stick. Bring the two strings together at the top and tie them together with several knots. Hammer a nail into the wall and hang. All set!


Feel free to experiment with various styles/colors! At one point I wrapped yarn around the board itself rather than creating tufts. I made a cascading effect by cutting the yarn at different lengths or tying the yarn tufts in a diagonal rather than straight across the canvas. Share if you do create one - I'd love to see!


DIY || #25 || Natural Wallpaper in 3D

Tuesday, June 10


Despite the many downsides to moving, there also quite a handful of joys. For starters, you get to rid of stuff you somehow managed to hide away for months. And the best part is planning an entirely new decor theme for your space. As always, I got my eye on keeping a low budget all the while finding unique ways to style my space. Thus, I present to you, the Framed 3D Botanical Wall! Some of you may have seen a twist to this DIY from before when I was in college, but now that I've 'upgraded' to real-world adult life, I've transformed this decor into something more refined, polished, and sophisticated. As always, super easy and super affordable! Here's the break down:


You'll need: empty frames (bought a whole bunch of different sizes at Goodwill for $2 each!), fake flowers, cream colored masking tape, scissors, nails, and a hammer. 


I first started out by organizing the frames and flowers on the floor to get an idea of a pattern. Then, simply hammer nails into the wall where desired, hang your frames, and tape the flowers into an organized and neat pattern. Easy breezy!


I kept my decor just to a diagonal, but you could easily fill up a whole wall with this decor. Hope y'all like it!