There's nothing I love more than combining flowers with...well, just about anything. Now that spring is just around the corner, I'm going to go a little floral crazy over here. First up, these cute and fun floral drink coasters that are great for adding a little unexpected pop to your table next time you're hosting a get-together. They could also make great, handmade gifts for someone's housewarming party! Overall, they're colorful, simple, and easy...just the way I like it! Read more to learn how to make these floral delights...
Showing posts with label home. Show all posts
DIY | Floral Coasters
Wednesday, February 17
In this series, we share local adventures and help you find ways
to be a tourist in your own hometown
I am guilty of silent tourist shaming. When you watch someone try to maneuver an unfamiliar place...well, let's just say it's quite amusing. There are the confused faces, the camera faces, the awestruck faces when they stare up at a monument you rush past every day. Tourists are very easy to spot, but how come? Perhaps it's their mannerisms or dress -- I mean, who wears ankle socks in the middle of summer?! But that's not quite it. Tourists are easy to spot because they're simply paying attention - to everything. Sounds, signs, storefronts, street art, statues...everything from magical to mundane is worth a few more seconds to think about, look at, listen to, or capture. They are in a constant state of trying to put together as many pieces as possible despite knowing they may never see the entire picture. They are, simply, in a different mindset.
Tourism, done well, has little to do with distance. You could travel to the opposite side of the world and be considered a "bad" tourist. Because, at its core, tourism is all about learning and curiosity driven discovery. And that can happen every single day, right outside your door. I never really thought this was possible until I tried it for myself and it's completely changed how I view my city. So, I'm excited to start this new series that will showcase ways you can capitalize on what your city has to offer. To start, I've gathered a few tips below on how to get your mindset ready to travel like a tourist in your hometown...
Saturday, December 19
This month I decided to celebrate the holidays a little differently. For the first time, I'll spend them away from home. I was a bit nervous about the idea at first. I absolutely love Christmas in California. It's warm, relaxing, and my mom always cooks a bombtastic meal. Every single time. I also get to wear my pajamas all day and not feel one ounce of shame about it. However, now that I'm married and living this whole adult life deal, I thought it was about time I expand my Christmas traditions. So, this month, I'll be traveling across Europe and spending the holidays with my husband and his family in the Czech Republic! The weather will be colder, the language harder to understand (have you ever tried to learn Czech?!), and possibly a lot more beer at dinner time. But life is an adventure right?! I'm ready to dive in.
In the meantime, you can follow my colorful journey as I trek across Paris, London, Geneva, and Prague! My unifying theme will be #followthatpinkcoat as I capture colorful sites wearing this perfect pink coat I found from Asos. There will also be travel posts on the blog for each city coming this month, as well as daily updates on my Instagam (@creativekipi). Let's go for a colorful adventure this season, shall we?!
How are you celebrating the holidays? Feel free to share below - I'd love to hear!
Friday, May 8
Today's project is inspired by my favorite body of nature - the sun! I was approached to collaborate with Glade to creatively come up with a DIY Decor project that reminded me of summer days by a lake. I immediately felt nostalgic for sunsets over the water, bonfires crackling into the pastel sky, and that giggly warm realization you have when you realize life is pretty darn beautiful. Welp, now that the cheesy inspirational me has spoken, let's get to the fun part! This ombre wall decor is super simple, colorful, and can be completed in under 15 minutes. Sound good? I thought so! Click to read more for the deets...
Thursday, February 19
People...it's snowing buckets in Boston! I'm busy trying to make my life inside the apartment as colorful as possible because I was not built for this. First stop, the kitchen! Today's DIY Sprinkle Cake Top is a fun upcycle project I did after I found this cake stand at a thrift shop in Cambridge. The top had a thin crack on it, so I simply used spray paint to cover the blemish and added sprinkles with a paint brush! I think it's a cute way to add a lot of appeal to your baked goods (and just might make people believe your baked treats are way more legit!). Just don't forget to add the cherry on top! Simple instructions below...
What you'll need:
-Cake stand and top (bought mine for $6 at a thrift store)
-Spray paint
-Variety of multi-surface paints
-foam brushes or paint brushes
Instructions:
Begin by thoroughly washing your cake stand! Once dried, prep an outside space with plastic or trash bags and spray paint the top (though you can do the bottom part too if you wish.. I just liked the contrast). Since my top was clear, I used about 3 coats of paint so it would be a stronger, solid pink color. I let it dry outside for a couple days so the smell would dissipate.
The last bit is the fun part! First, paint the two leaves on top adjacent to the top handle. In reality, I did this part last and, luckily, it worked out. However, it is much better to space out the sprinkles knowing where the leaves are positioned. Once the painted leaves are dry, decide on a handful of colors you want your sprinkles to be and, using a foam brush, make thin rectangles around the top section. I found this easiest to do by coating one side of the foam brush and pressing it onto the platter. The last step is to paint the handle bar that bright red for a cherry look! It's definitely best to save this for last so that you can use the handle to turn the top when painting the sprinkles. I waited another day until everything was dry, though in reality it was dried after about 30 minutes! A couple fun alternatives to get this look is to cut sprinkles from thin, colored paper and glue it onto the platter like paper mache style. Another option is to buy sticker sheets, print out the sprinkle shapes, cut, and stick!
Isn't this almost too tasty looking?! Have fun :)
Monday, February 2
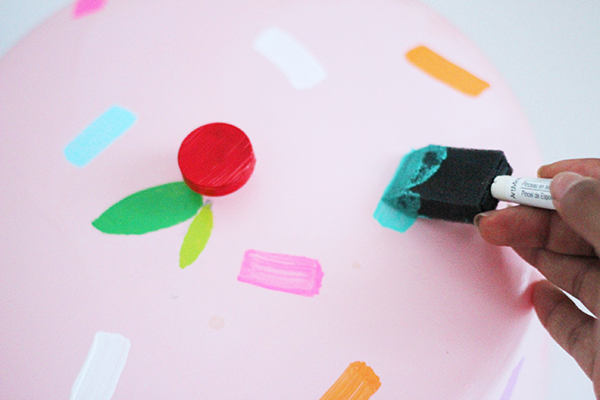
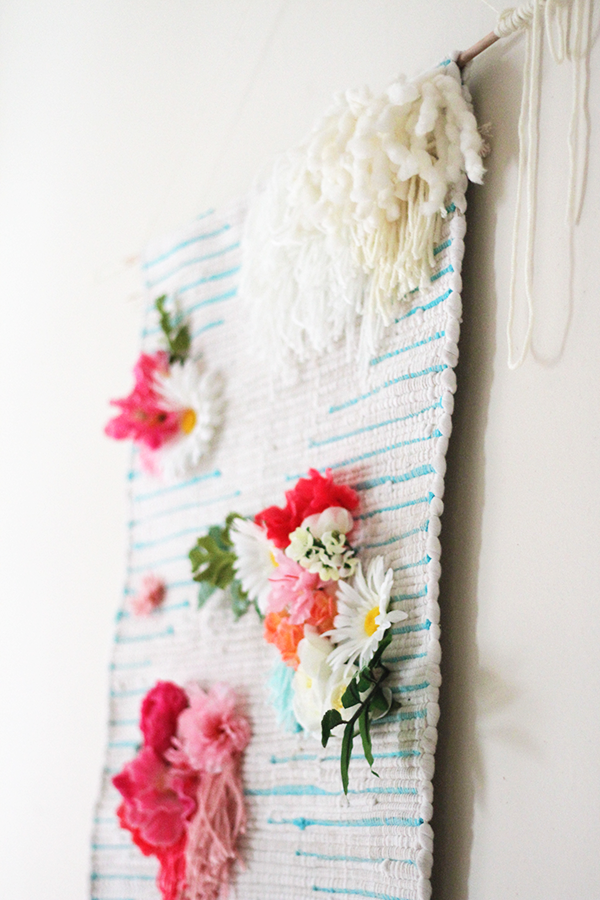
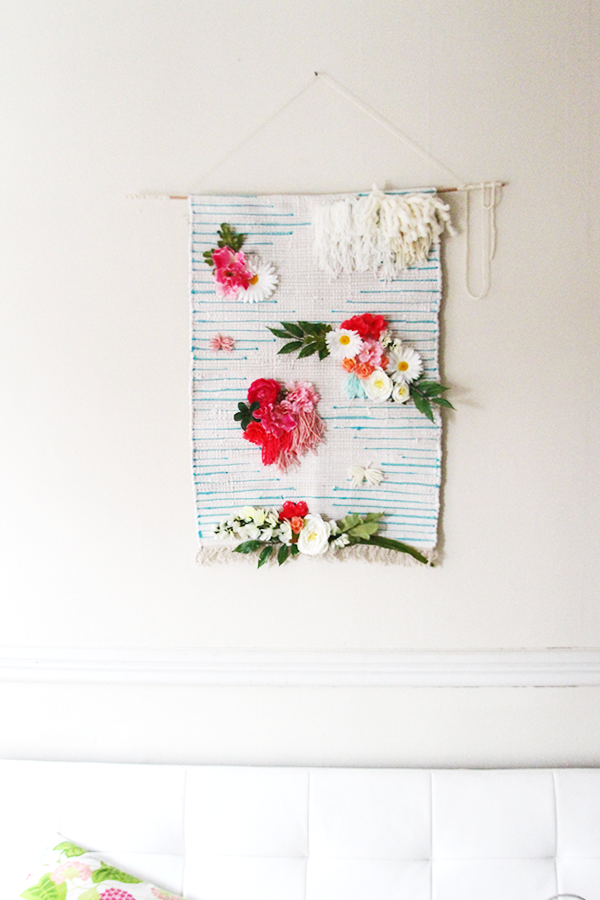
And I did it again - a DIY Woven Wall Art with less than half the effort! Clearly I really don't want to learn the beautiful art of weaving, but when you don't have much time after work it's nice to still create something similar in less time. Last year, I created this "No-Weave Wall Hanging" which introduced a new way to style tassels onto an embroidery sheet. Today's project is definitely one of my all time favorites that uses this technique and, thankfully, my roommates agree since it's now a new part of our apartment decor! I purchased this Plum & Bow Connected Stripe Rug from Urban Outfitters for $24 and bought about $20 of plastic spring flowers from Michael's Arts & Crafts Store (they were on sale!). Together, with some yarn and glue, I was able to create this wall art that adds a unique twist to the typical woven wall pieces. The main trick is to find a rug with texture and a hand woven-like pattern as a base. The way I created this piece allows for the flowers and 3D elements to be taken off and replaced if need be, so you can always change the look with the seasons or simply re-use the rug for its original purposes! Versatility and colorful creativity - that's what I'm talkin' about! Alrighty, here are the details below:
What you'll need: a rug (ideally thin enough to pierce flora stems through or with strong weaving - I got this one at Urban Outfitters); flowers and greenery (from Michael's); yarn; string, plastic embroidery sheets, scissors; nails, glue gun.
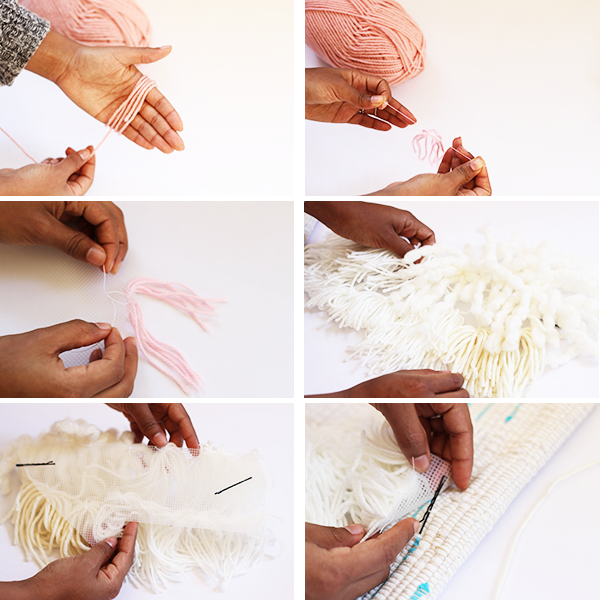
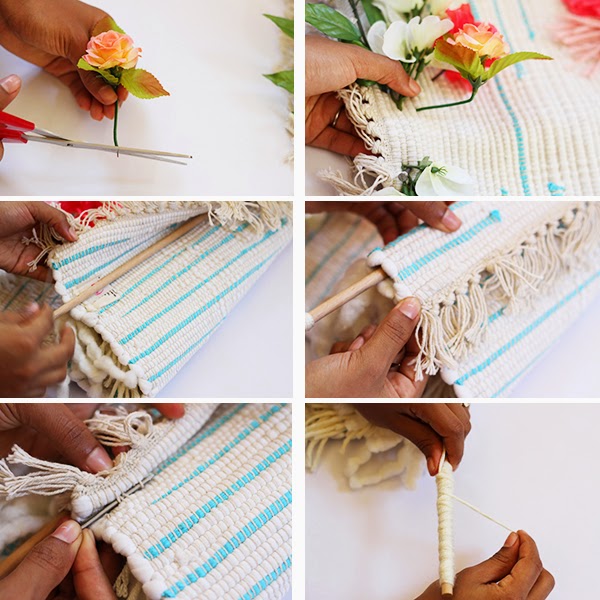
Step-by-step Instructions: First, layout your flowers and yarn and try to sketch or visually imagine a design you want to create on your rug. Next, to create the yarn tassels, I wrap the yarn around the palm of my hand a few times (around 7-10 times). Carefully slide this off your hand and, with a thin string, make a knot on one side of the yarn loop. Use scissors to cut the other end of the loop so the bottom yarn hangs freely. Depending on the design you want to create, tie these string tassels to the plastic embroidery sheet. I easily attached the plastic embroidery sheets to the rug using bobby pins - just slid them into the string wrapping throughout the rug (this is why it's helpful to have a rug like this as your base with woven-like details!). To attach flowers to the rug, I cut the stems so there was at least 2-3 inches from the petals/leaves. Carefully, I slid the stems in between the woven parts of the rug. On the back side of the rug, I bent the floral stems so they would not move. An alternative thing that can be done (and that I did in some cases when the stems were too short), is to use a glue gun and attach the flower directly to the rug surface.
To prepare the rug for hanging: I bought a thing wood dowel for less than $1 at Michael's. Fold one end of your rug over this wooden dowl (how much you fold over depends on how long you want your wall tapestry...I did about 3- inches). Sneaky little trick I did here! Since the rug is quite thick and heavy, I knew that glue or sewing wouldn't hold very well. SO I took some long, thick metal nails (yes, nails!) and wove them through the string on the rug as if I was threading them shut. I used three nails in total (sides and middle). Lastly, wrap string or twine around the edges of the dowel to create a line of the rug to hang on a nail. If you haven't put a nail in the wall yet - you should do that too! That's it! Super fun craft to brighten up your home decor! Give it a try or let me know what you think!
Sunday, June 22
Keeping with the theme of my apartment decor, such as my botanical wall and jewelry holder, I've done it again with my window treatments using the most basic materials! It is such a unique addition to the room and surprisingly only took an hour from start to finish to complete. The hardest part about this project is finding the branches, which was surprisingly a breeze for me after discovering a pile of branches in my previous apartment building's back lot. The goal is to find evenly sized-length branches if you are doing more than one window, and also that they are medium weight - not so thin they will snap but not so heavy they won't stay up. I wanted my branches to blend with my wall so I spray painted them white and let them dry overnight. Here's what you''ll need: branch(es), spray paint (if you want to color them), measuring tape, screw-in bicycle storage hooks, nail (or screwdriver), hammer, and curtains.
Measure how high you want your branches based off the length of curtains you have, then measure perpendicularly across the window top and make two light marks with a pencil - one where each hook will be. Because I don't have a screwdriver to drill holes in the wall, I simply used a thin nail to hammer a small hole, pulled it out, then screwed in the bike hooks (using some muscle!). Once the hooks are secure simply place the branch across them and check that it is even. If your curtains have loops, you can slide them across the branches. Since mine did not, I cut small holes along the top of the curtain and tied them to the branch using twine ribbon. I found this works better because I could adjust the curtain length based off how tight or loose I tied the ribbons (this helps if the branch is curved and would result in uneven curtain length at the bottom). Alright, that's it!
Just so you can see what it looks like before the curtains - another great idea just for general decor!
Friday, April 5

I know, I know. I'm going a bit crazy with the home decor lately but that can all be explained! After landing my first ever full-time job (yay for post-grad life working out!) I've been scouring apartment sites for places to rent in Boston. Unfortunately, the stunning, all-natural, bright, spacious, and homey pictures I've been looking at on Pinterest have raised my expectations a bit too high now that I realized my budget probably won't get me anywhere close. Alas, the past friday faves have been my outlets to *imagine so wonderfully* what I would do if I had my perfect apartment space. For starters, there would be tons of natural light -- and I'm talking huge windows, please. Next, it would be a colonial, rustic place with hardwood floors and flat, white walls. The rest of the space I would pretty much decorate in all things Anthropologie, Urban Outfitters, vintage/thrift finds, and the occasional Ikea DIY piece here and there. Ah, if only this were real life!
room image | one | two | three | four
Labels:
decor,
friday faves,
furniture,
home,
room
Friday, March 29
I have been loving the triangle look on all things decor. I think triangles are such interesting shapes because they can be warm and edgy simultaneously. I dream of the time when I can finally do whatever I wish to my living space, but in the meantime these are my fave triangle decor favorites! And if you're looking for equally killer triangle clothes, these cut out jeans are pretty bomb (see here).
one // two // three // four // five