Showing posts with label nature. Show all posts

DIY | Easy Sunset Wall Art

Friday, May 8


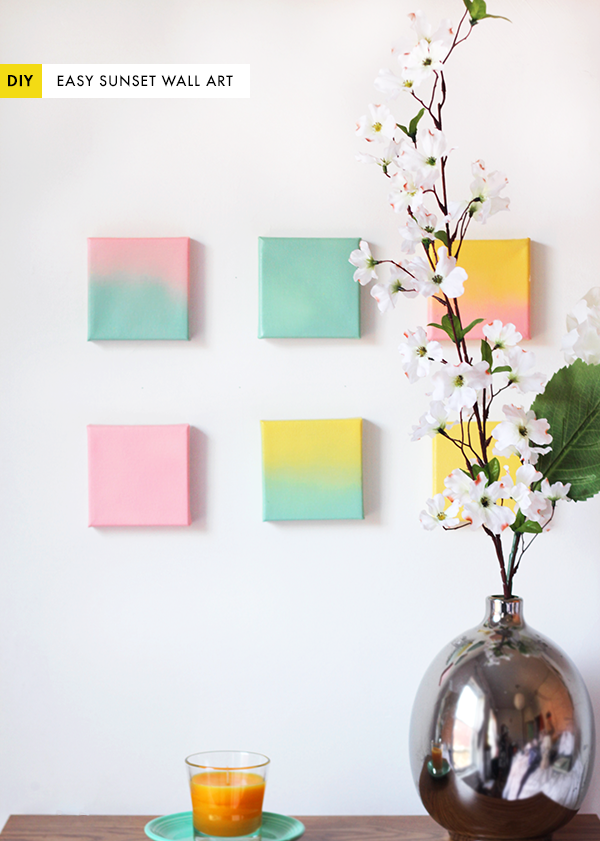
Today's project is inspired by my favorite body of nature - the sun! I was approached to collaborate with Glade to creatively come up with a DIY Decor project that reminded me of summer days by a lake. I immediately felt nostalgic for sunsets over the water, bonfires crackling into the pastel sky, and that giggly warm realization you have when you realize life is pretty darn beautiful. Welp, now that the cheesy inspirational me has spoken, let's get to the fun part! This ombre wall decor is super simple, colorful, and can be completed in under 15 minutes. Sound good? I thought so! Click to read more for the deets...


DIY || #26 || Out on a limb

Sunday, June 22


Keeping with the theme of my apartment decor, such as my botanical wall and jewelry holder, I've done it again with my window treatments using the most basic materials! It is such a unique addition to the room and surprisingly only took an hour from start to finish to complete. The hardest part about this project is finding the branches, which was surprisingly a breeze for me after discovering a pile of branches in my previous apartment building's back lot. The goal is to find evenly sized-length branches if you are doing more than one window, and also that they are medium weight - not so thin they will snap but not so heavy they won't stay up. I wanted my branches to blend with my wall so I spray painted them white and let them dry overnight. Here's what you''ll need: branch(es), spray paint (if you want to color them), measuring tape, screw-in bicycle storage hooks, nail (or screwdriver), hammer, and curtains. 

Measure how high you want your branches based off the length of curtains you have, then measure perpendicularly across the window top and make two light marks with a pencil - one where each hook will be. Because I don't have a screwdriver to drill holes in the wall, I simply used a thin nail to hammer a small hole, pulled it out, then screwed in the bike hooks (using some muscle!). Once the hooks are secure simply place the branch across them and check that it is even. If your curtains have loops, you can slide them across the branches. Since mine did not, I cut small holes along the top of the curtain and tied them to the branch using twine ribbon. I found this works better because I could adjust the curtain length based off how tight or loose I tied the ribbons (this helps if the branch is curved and would result in uneven curtain length at the bottom). Alright, that's it! 


Just so you can see what it looks like before the curtains - another great idea just for general decor!


DIY || #25 || Natural Wallpaper in 3D

Tuesday, June 10


Despite the many downsides to moving, there also quite a handful of joys. For starters, you get to rid of stuff you somehow managed to hide away for months. And the best part is planning an entirely new decor theme for your space. As always, I got my eye on keeping a low budget all the while finding unique ways to style my space. Thus, I present to you, the Framed 3D Botanical Wall! Some of you may have seen a twist to this DIY from before when I was in college, but now that I've 'upgraded' to real-world adult life, I've transformed this decor into something more refined, polished, and sophisticated. As always, super easy and super affordable! Here's the break down:


You'll need: empty frames (bought a whole bunch of different sizes at Goodwill for $2 each!), fake flowers, cream colored masking tape, scissors, nails, and a hammer. 


I first started out by organizing the frames and flowers on the floor to get an idea of a pattern. Then, simply hammer nails into the wall where desired, hang your frames, and tape the flowers into an organized and neat pattern. Easy breezy!


I kept my decor just to a diagonal, but you could easily fill up a whole wall with this decor. Hope y'all like it!


DIY Project || #6 || Jewelry Wall Branch

Tuesday, January 8

diy jewelry wall branch hanger
INGREDIENTS:

Stray branch (don't harm the trees!)
Long, thin leaves or yarn
Thin hair ties
White push pins

INSTRUCTIONS:


STEP ONE: Carefully loop a long branch leaf (or yarn!) around the furthest stable ends of the branch.
STEP TWO: Grab the leaf edges together and slowly begin tying the thin hair tie as though it were a ponytail. Leave a little slack which will be used later to slip over the pushpin in the wall.

STEP THREE: The branch should look like this -- kind of like a large tear drop.
STEP FOUR: Then, press two push pins into the wall. It helps to put the branch up against the desired wall area and lightly mark the width of the branch with a pencil. I ended up placing the pins a few inches inside of the very edges.

STEP FIVE: Taking the little slack in the hair tie, loop it over the pushpins on the wall. 
STEP SIX: If necessary, readjust the pins of your wall to level out the branch so it is as straight as possible. Then, just begin draping your necklaces, hook your earrings, and hang your bracelets!