Showing posts with label baking. Show all posts

DIY || #36 || Eye Like My Lashes on Macarons

Monday, April 6

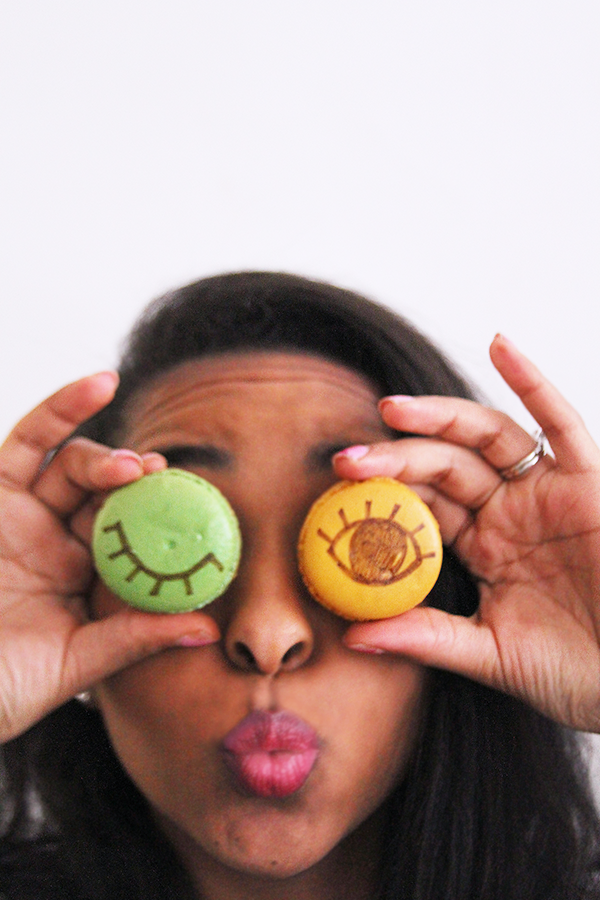
I've hopped onto the macaron train and I'm not getting off! I'm so inspired by Sugar and Cloth's #Glossaryofmacs, a series of fun ways she paints or creates fun images on macarons! The best part - they are all edible! Today's DIY is a super sweet way to bat your eye lashes at that crush of yours during that cocktail party...or just flirt with yourself I guess. Hey, you are pretty good looking, right? All you need are food coloring pens and a batch of macarons. Prepare for a pretty sweet sugary ride! Here are the deets:


What you'll need:
1. Macarons (I bought these babies at a cute Macaron Van that drives around Boston - Cameo Macaron)
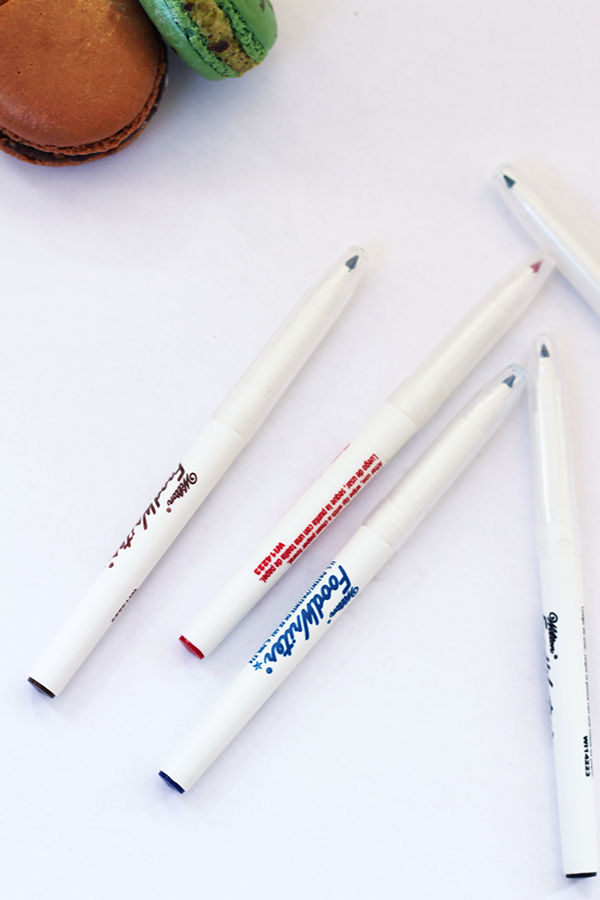
2. Edible Color Food Markers (purchased a pack at Michaels)


Steps: 
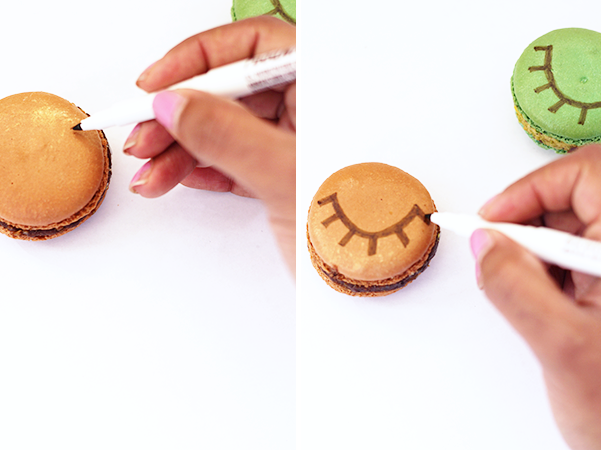
1. Like I said, super easy! Simple grab a macaron and draw the outline of a semi-circle. Feel free to make your eyelid as thick as you'd like..I preferred mine a little bit on the thinner side. 
2. Next, add lines extending outwards around the semi-circle to make the individual lashes.
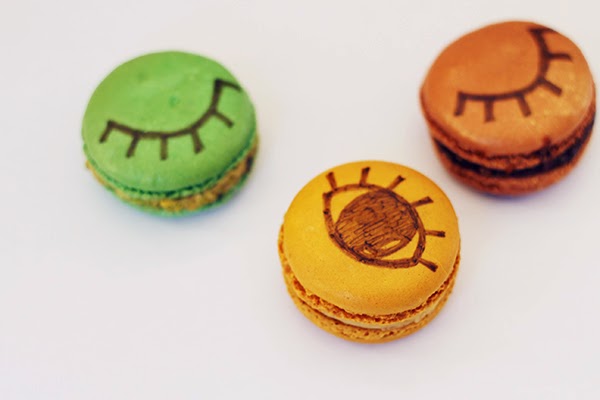
3. Repeat per macaron. It's fun to spice up a few and add an eyeball. Simple draw an oval, add the lashes to the top, and a big circle in the middle for an eye that pops! That's it! 


Hope you all like today's project and let me know if you try it! Share your creations on instagram (#diykipi) and follow my colorful ride (@creativekipi)!


DIY || #35 || Sprinkles too, please!

Thursday, February 19


People...it's snowing buckets in Boston! I'm busy trying to make my life inside the apartment as colorful as possible because I was not built for this. First stop, the kitchen! Today's DIY Sprinkle Cake Top is a fun upcycle project I did after I found this cake stand at a thrift shop in Cambridge. The top had a thin crack on it, so I simply used spray paint to cover the blemish and added sprinkles with a paint brush! I think it's a cute way to add a lot of appeal to your baked goods (and just might make people believe your baked treats are way more legit!). Just don't forget to add the cherry on top! Simple instructions below...


What you'll need:

-Cake stand and top (bought mine for $6 at a thrift store)
-Spray paint 
-Variety of multi-surface paints
-foam brushes or paint brushes


Instructions: 

Begin by thoroughly washing your cake stand! Once dried, prep an outside space with plastic or trash bags and spray paint the top (though you can do the bottom part too if you wish.. I just liked the contrast). Since my top was clear, I used about 3 coats of paint so it would be a stronger, solid pink color. I let it dry outside for a couple days so the smell would dissipate. 


The last bit is the fun part! First, paint the two leaves on top adjacent to the top handle. In reality, I did this part last and, luckily, it worked out. However, it is much better to space out the sprinkles knowing where the leaves are positioned. Once the painted leaves are dry, decide on a handful of colors you want your sprinkles to be and, using a foam brush, make thin rectangles around the top section. I found this easiest to do by coating one side of the foam brush and pressing it onto the platter. The last step is to paint the handle bar that bright red for a cherry look! It's definitely best to save this for last so that you can use the handle to turn the top when painting the sprinkles. I waited another day until everything was dry, though in reality it was dried after about 30 minutes! A couple fun alternatives to get this look is to cut sprinkles from thin, colored paper and glue it onto the platter like paper mache style. Another option is to buy sticker sheets, print out the sprinkle shapes, cut, and stick! 


Isn't this almost too tasty looking?! Have fun :)